Reading Time: < 1 minute

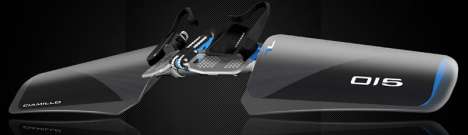
For the past seven years, the boffins at Lunocet have been working to develop the most efficient form of underwater human propulsion. The result of those efforts can be had for $1,800 in the form of a kind of mono-fin that introduces what I discern to be 2 unique features setting it apart…

  1. The first of these features are the footplates. Wearing bicycle shoes, the user clips into aluminum footplates or stretch resistant non-rubber foot pockets.
  2. Precisely positioned hydrofoils designed to increase in power on the up-stroke as compared to conventional mono-fins.

The Lunocet comes in 4 models, the Aphotic, Overt, Naked and Widder. The difference between these models is unknown. While pleasant to look at, the Lunocet Web site doesn’t provide many details. There are no doubt some skilled industrial designers and web designers at work at Lunocet, how well the fin works is unknown.

The 2.5lbs Lunocet fin can reportedly help you swim around 8MPH. or more than 3MPH faster than Michael Phelps! With $1,800 less in your pocket maybe 8.2MPH and you’re waiting for Mike on the pool deck with a freshly packed bowl and some Doritos.

Posted by: Jay

Reading Time: 2 minutes

Alaia Wooden Surfboard project: Post 1 | Post 2 | Post 3 | Post 4 | Post 5 | Post 6 | Post 6b | Post 7 | Post 8 Finis

They say a picture is worth a thousand words. In this case I think the words better do the talking because it’s difficult to capture the progress made with the concave in a photo. I haphazardly arrived at a method for creating the concave and it goes like this…

  • Snap center-line (nose to tail) with chalk
  • With the belt sander on the center-line at shallow angle, I quickly and carefully sand in one direction
  • With hand sander, I work from and apply pressure to the center and work outwards
  • I sand a length of about 18″ at a time, using 12 strokes near the center, 6 a little further out and 3 near the edge

… I repeat this process over and over, each time making the concave deeper and feathering out toward the edges a little more. Reestablishing the center line helps keep the deepest point consistent. I happened to have a weighted metal rod I used to use when tuning skis. I place this rod on the top of the concave on one side let it roll up the other side of the concave and eventually settle in the center of the board (if it doesn’t I sand more). I included a picture of the rod as well a some calipers I’ll use when shaping the rails.

The hand sanding helps refines the work done with the belt sander. I felt a little out of control with the belt sander, but found the results more predictable when working quickly (not letting it bite too much in one place). I tried using the palm sander and it did a nice job, but the dust got out of control. It if wasn’t winter I’d be working on this project in the garage, but I’m in my workshop – which is also the boiler room , where I need to keep dust to a minimum.

The process is taking longer than anticipated, but I’m happy with the results so far. Punxsutawney Phil says 6 more weeks of winter anyway, so I’ve got nothing but time. I’ll keep working on the concave using the methods described above and start the next post on the Alaia project with the overall sanding and Linseed oiling.

Posted by: Lawrence

Reading Time: < 1 minute

Alaia Wooden Surfboard project: Post 1 | Post 2 | Post 3 | Post 4 | Post 5 | Post 6 | Post 6b | Post 7 | Post 8 Finis

Mini Post: I’ve begun sanding the concave, but it’s hard to tell in pictures so I’ll do that in the next update. I started with the belt sander and formed the shallow ‘V’ in the center of the board. The concave should start a third of the way from the nose, so at 7′ overall, I started 28″ from the nose and worked my way to the tail.

I’m not exactly practiced at the belt sander and I removed more material in some areas than others. Before I go back to the belt sander and exacerbate the unevenness, I thought it best to hand sand a bit to get it more or less back to level. I’m working with 80 grit on the belt sander and 60 grit by hand (because it’s what I had). I’ll work my way up to 220 as I get closer to the final concave. When I start applying the linseed oil in phases I’ll sand before and between applications using 280-320 grit.

Looking at the board upside down and from the back the shape loosely resembles a bat. The lowest point in the middle, rising on both sides and then slightly dropping at the ends (see the picture of Rasta’s board in Post 1). The edge needs to be sharper on the bottom since the Alaia’s hold the wave that way (no fins here). When the sanding has progressed to a point where pictures clearly show what’s happening, the explanation above should hopefully be obvious.

Posted by: Lawrence