Reading Time: < 1 minute
I can do the thing where he bangs the back wheel with the wooden board.
Posted by: Lawrence
I can do the thing where he bangs the back wheel with the wooden board.
Posted by: Lawrence
I took the Alaia out today for the first time. I had been surfing my longboard in about shoulder-high surf for over an hour and was anxious to run back to the car to get it. When I finally popped in the water with it I sunk like a stone. I spent the next 15 minutes or so trying to figure out the balance point and how to paddle it without it sliding from under me.
Once I felt comfortable controlling the board and paddling around, I walked into about waist high and belly-rode a dozen waves – FUN. I felt like I could turn it and was feeling more confident. I tried to stand but admittedly couldn’t – not this time out. I sort of stood, but nothing where I was actually riding so much as sinking. In the right conditions and I’ll get up on the Alaia and ride it.
The board became a conversation piece on the beach and in the parking lot. After I answered a litany of questions from one older guy he said I’d have the whole speech down-pat soon. Another guy told me he made an Alaia this winter using cedar and suggested I round the bottom rails. I’ve not heard or read this anywhere – always thought the rail should be knifey on the bottom? He was impressed with the board and that I had Paulownia wood – I told him where he can buy it.
Posted by: Lawrence
I read Cormac McCarthy‘s The Road last summer and walked around in a stupor for about a week. The book was so vivid, so real and the writing so disturbingly poetic about a subject that makes the hairs stand-up on the necks of all of us.
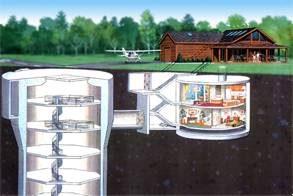
With talk of Armageddon, swine flu, Heidi and Spencer’s marriage and the frightening possibility that they may procreate, I’m thinking it’s a good time to ditch – or at least make plans to.
When all hell breaks loose I hope to be safely tucked-away in my underground lair – Lex Luther style. Pool, theater, chef’s kitchen, garden (Pineapple Express?), air / water filtration and Scarlett Johansson (what are her options? I’m feeling lucky).

Decommissioned missile base properties, specifically Atlas-E, Atlas-F, Titan I, and Communications Bunkers are for sale around the country. Priced from $165,000USD to over $1million USD, sites are tested or treated (e.g. asbestos) to ensure a safe living environment. Most have wells, power generators (even blast doors and sometimes decontamination showers) and the bones to build your own dream, albeit apocalyptic, refuge.
Stock-up on canned foods, seeds, grow lights and powdered drink mix. Put that order in for a treadmill, tanning bed, hand crank flashlights and radios. Get the dog a new bed, tons of chew toys and enough food. Don’t neglect music, movies, Wii games and books to last a while. Maybe you’ll never want to come back up? Or at least not until they take The Hills off the air.
Posted by: Frank
Please follow Bitness on Twitter. Our Twitter name is “TheFitGeek” – someone got Bitness before we did. Sadly we were early Twitter adopters for personal use but late in the game to promote our blog.

Anyway, pass the word along and start following “TheFitGeek” on twitter!
There is a good interview with Jon Wegener on Thalia about shaping an Alaia. But first, a quick word about Bitness. We’re in the midst of a re-org – lining up manufacturers for new product reviews, introducing new contributors, marketing, etc. Please stay tuned for more exciting news and also let us know if there is anything you would like us to test or write about.
Now, on to the article…
http://site.thaliasurf.com/blog/interview-with-jon-wegener-from-alaia-surfboards/
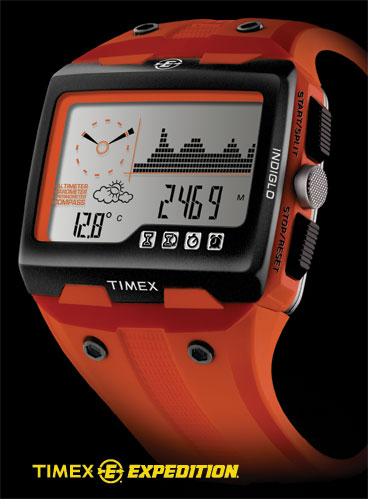
I’ve owned a Suunto Observer for years, a gift from the wife and I love it. With it I can tell which direction I’m headed, altitude, barometric pressure, temperature and of course the time. While somewhat bulky, it is still stylish IMHO and once configured performs well.

Timex will start shipping the Timex® Expedition® WS4™ on May 1, 2009. Similar in functionality to the Suunto, but no where close in looks, the gargantuan Expedition WS4 offers altitude, weather conditions, compass heading and time at a glance.
Unlike the Suunto, which has you spinning 360s to configure the compass, the Expedition WS4 can be used the moment it comes out of the box UPDATE: Both the Suunto and the Timex Expedition WS4 require manually calibrated. Timex also offers a fabric band to make wearing it over your gear easier, allowing for outside temperature readings, not your arm.
Dubbed a “wrist-top adventure instrument,” the Expedition WS4 has weather forecasts that look to be fairly simple to read. On my Suunto I need to be somewhat of a weatherman and figure it out for myself. Available in a half dozen colors, water resistant to 50 meters and lit by Indiglo, the Timex Expedition WS4 is expected to cost about $200.
Posted by: Jay
Alaia Wooden Surfboard project: Post 1 | Post 2 | Post 3 | Post 4 | Post 5 | Post 6 | Post 6b | Post 7 | Post 8

I’ve finished oiling the Alaia and all that’s left to do now is ride the thing. I had a lot of fun building the Alaia and meeting others out there doing the same all over the world. In the end I’m very pleased with how it turned out and I’m really anxious to go and ride it.

I applied linseed oil a total of 4 times, with a full day between applications. I was pretty generous with the linseed oil, letting it soak in for 10 minutes before wiping away the excess with clean shop rags (I used these same rags to apply the next coat). I did light sanding between coats, after the second coat I noticed it was gummy in parts where I didn’t get rid of all the excess. Sanding those gummy areas didn’t help, so I went with a Scotchbrite pad I normally use tuning snowboards and it cleaned it right up.
This is the end of this series and I open it up to any questions or comments. I’ll post an update/pictures when I get it in the water (hopefully in about 4-6 weeks). There are a few of us eager to give it a go and it should make for an entertaining session!
Posted by: Lawrence
Alaia Wooden Surfboard project: Post 1 | Post 2 | Post 3 | Post 4 | Post 5 | Post 6 | Post 6b | Post 7 | Post 8 FInis

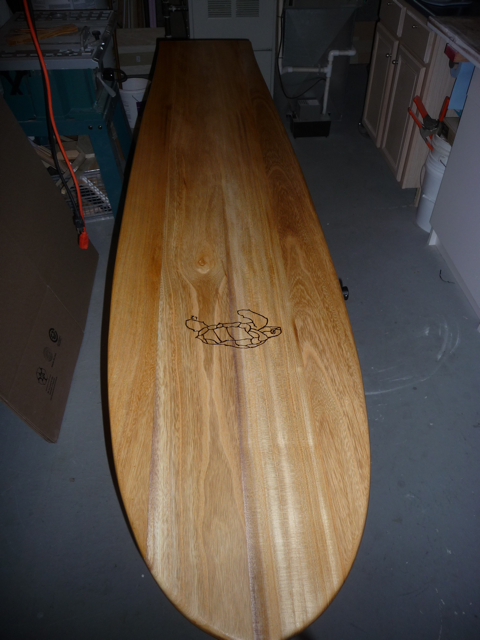
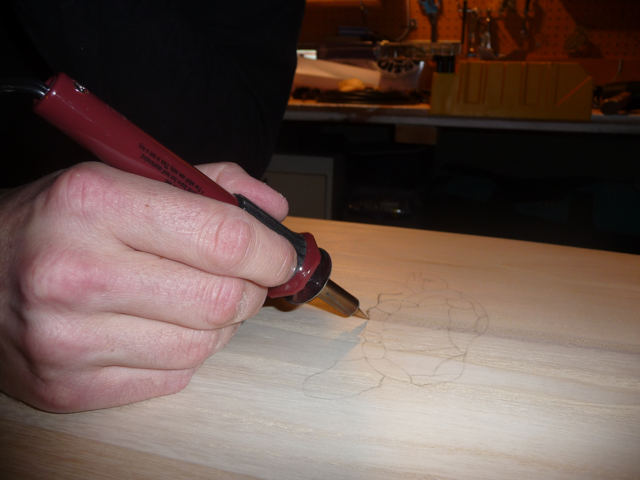
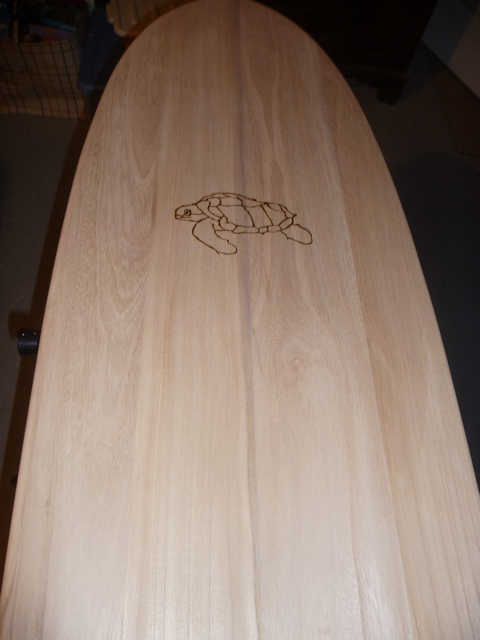
Thank you to my wife Jen for drawing the turtle, transferring it to the board and trusting me to burn it in. For those interested, I used a Creative Versa-Tool Kit - 120V/ 25-Watt (made by Walnut Hollow) purchased for about $25. I used the tapered point and lightly followed the penciled-on drawing. As the wood became scored, I could press harder to get the burn and depth I wanted. After about 10 minutes the tip was so heated-up it actually bent a little (causing a minor blemish).
I’ll let the pictures do the talking (click images to enlarge)…


Posted by: Lawrence
Alaia Wooden Surfboard project: Post 1 | Post 2 | Post 3 | Post 4 | Post 5 | Post 6 | Post 6b | Post 7 | Post 8 FInis
Minor update – life again overwhelms! The turtle was drawn on and will be burned this week. Looks great thanks to the wife!
A friend sent this great trailer called ‘Tom’s Creation Plantation Trailer’ – it’s a trailer for the half surf film/ half shaping tutorial about ancient wooden surfboards (Alaias) due out in April. Of course I’m very interested in this video and will review it once I can get my hands on it.
Watch the trailer – some really good footage in there (including an itchy squirrel)…
Posted by: Lawrence
Alaia Wooden Surfboard project: Post 1 | Post 2 | Post 3 | Post 4 | Post 5 | Post 6 | Post 6b | Post 7 | Post 8 Finis
Paulownia dust tastes like shit. I was smart enough to wear a respirator, but in between sips of beer it was bound to be tasted and digested. I consider it part of the “Alaia chi” – I am now one with this board that took longer than I expected to finish – but I’m stoked with the results.
 Between sick kids, work, travel, snowboarding, sick me, sick wife, dog sitting, freelance, guitar lessons, shoveling snow and just about any excuse I can conjure… well, I took my sweet time. No challenge really since I don’t have a winter suit and looking at a finished board for months will be torture. But by working slowly I was methodical, careful and well researched. I think I made a pretty sick Alaia, I’ll know when I ride it in late April (most likely).
 There’s still no oil on it yet (waiting to wood-burn a turtle on it), but I sanded to 400 grit and it already feels smooth as silk. I will definitely build another one of these and I think if I could do anything differently, it would be to do the entire project outdoors. The time to clean up the dust was almost as long as the time spent building the board! Between a tack clothe, shop vac, compressed air and elbow grease, I finally have a proper, dirty basement workshop again.
 Once I burn the turtle graphic and apply the oil I’ll wrap-up the series of building posts by posting some final pictures. At some point in the spring when I can venture out in my 4/3, I’ll post an update on how it was to ride. For now it’s a conversation piece that beckons me. Hamish in Australia, who has been following this project, has his Alaia finished and has already and had a session with his mates. Hamish says “the trick is to paddle really hard, not let the tail swing around from underneath you” and he also reports it is very fast.
Click on any of the images for a larger view. You can hopefully see an eased top/deck – rolled edges and sharp edges on the bottom. The picture from the tail shows the concave best and the upright pic to the right the overall shape and size. I would estimate the total time to get the board to this point to be about 12 hours. I don’t expect the 3-4 coats of oil to be more than an hour max (light sanding between daily applications) and the turtle graphic maybe 30 minutes.
Thank you for all your comments and please keep them coming. Hamish sent me pics via Facebook and he did an amazing job. I’d like to see what others have done and perhaps (with your permission) post pictures of the Alaia’s all of you have built.
Posted by: Lawrence
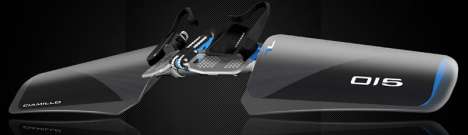
For the past seven years, the boffins at Lunocet have been working to develop the most efficient form of underwater human propulsion. The result of those efforts can be had for $1,800 in the form of a kind of mono-fin that introduces what I discern to be 2 unique features setting it apart…

The Lunocet comes in 4 models, the Aphotic, Overt, Naked and Widder. The difference between these models is unknown. While pleasant to look at, the Lunocet Web site doesn’t provide many details. There are no doubt some skilled industrial designers and web designers at work at Lunocet, how well the fin works is unknown.
The 2.5lbs Lunocet fin can reportedly help you swim around 8MPH. or more than 3MPH faster than Michael Phelps! With $1,800 less in your pocket maybe 8.2MPH and you’re waiting for Mike on the pool deck with a freshly packed bowl and some Doritos.
Posted by: Jay
Alaia Wooden Surfboard project: Post 1 | Post 2 | Post 3 | Post 4 | Post 5 | Post 6 | Post 6b | Post 7 | Post 8 Finis
They say a picture is worth a thousand words. In this case I think the words better do the talking because it’s difficult to capture the progress made with the concave in a photo. I haphazardly arrived at a method for creating the concave and it goes like this…

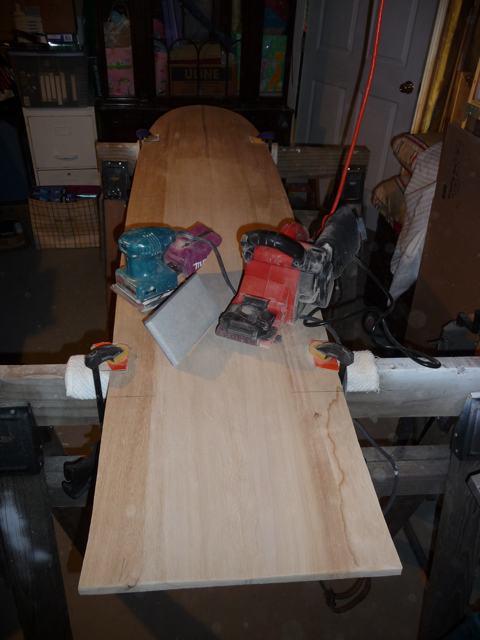
… I repeat this process over and over, each time making the concave deeper and feathering out toward the edges a little more. Reestablishing the center line helps keep the deepest point consistent. I happened to have a weighted metal rod I used to use when tuning skis. I place this rod on the top of the concave on one side let it roll up the other side of the concave and eventually settle in the center of the board (if it doesn’t I sand more). I included a picture of the rod as well a some calipers I’ll use when shaping the rails.

The hand sanding helps refines the work done with the belt sander. I felt a little out of control with the belt sander, but found the results more predictable when working quickly (not letting it bite too much in one place). I tried using the palm sander and it did a nice job, but the dust got out of control. It if wasn’t winter I’d be working on this project in the garage, but I’m in my workshop – which is also the boiler room , where I need to keep dust to a minimum.
The process is taking longer than anticipated, but I’m happy with the results so far. Punxsutawney Phil says 6 more weeks of winter anyway, so I’ve got nothing but time. I’ll keep working on the concave using the methods described above and start the next post on the Alaia project with the overall sanding and Linseed oiling.
Posted by: Lawrence
Alaia Wooden Surfboard project: Post 1 | Post 2 | Post 3 | Post 4 | Post 5 | Post 6 | Post 6b | Post 7 | Post 8 Finis
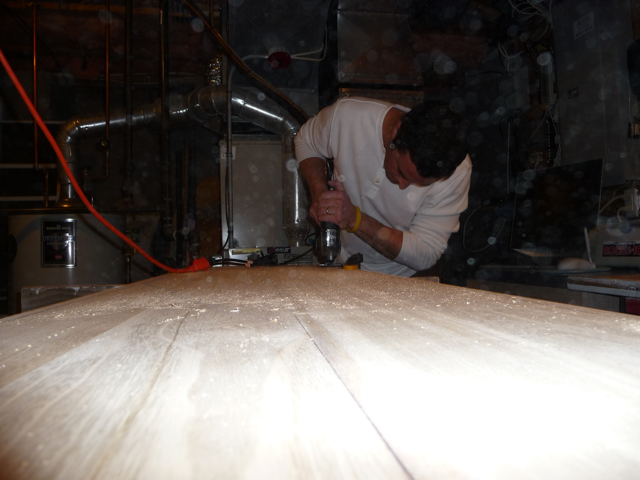
Mini Post: I’ve begun sanding the concave, but it’s hard to tell in pictures so I’ll do that in the next update. I started with the belt sander and formed the shallow ‘V’ in the center of the board. The concave should start a third of the way from the nose, so at 7′ overall, I started 28″ from the nose and worked my way to the tail.
I’m not exactly practiced at the belt sander and I removed more material in some areas than others. Before I go back to the belt sander and exacerbate the unevenness, I thought it best to hand sand a bit to get it more or less back to level. I’m working with 80 grit on the belt sander and 60 grit by hand (because it’s what I had). I’ll work my way up to 220 as I get closer to the final concave. When I start applying the linseed oil in phases I’ll sand before and between applications using 280-320 grit.
Looking at the board upside down and from the back the shape loosely resembles a bat. The lowest point in the middle, rising on both sides and then slightly dropping at the ends (see the picture of Rasta’s board in Post 1). The edge needs to be sharper on the bottom since the Alaia’s hold the wave that way (no fins here). When the sanding has progressed to a point where pictures clearly show what’s happening, the explanation above should hopefully be obvious.
Posted by: Lawrence
Alaia Wooden Surfboard project: Post 1 | Post 2 | Post 3 | Post 4 | Post 5 | Post 6 | Post 6b | Post 7 | Post 8 Finis
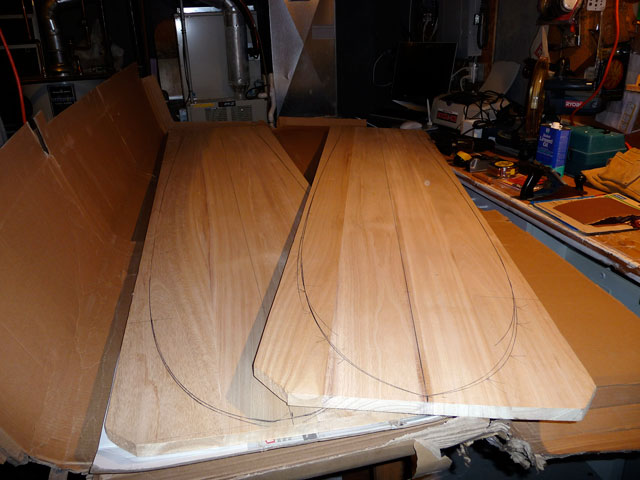
 Significant progress this weekend with the Alaia project. I cut the board to shape with a jigsaw, working in one direction. I said in the previous post that I wouldn’t cut the Stuth tail, but I had a change of heart. I like the side-cut it creates and given my 24 years of snowboarding I’m drawn to that shape (yeah, I’m that old and have boarded that long!).
Because the board needed to be clamped and un-clamped (3 times) I made cuts on either side of the board, with 90° cuts to remove material as I progressed. After the jigsaw work was done I used my belt sander to fine-tune the edges to get a uniform ~3mm distance from Jon’s marks (as explained in post 2).
 Once I was satisfied with the shape, I used a pocket plane to put a 1/4″ bevel on the top edge (you can apply very light pressure since the Paulownia wood is so soft). Holding the plane at 45° and moving in one direction, I cut until Jon’s marks were no longer visible. After inspecting and small tweaks I flipped the board and transferred the center line which I’ll use to create the concave. I also transferred 3 perpendicular markings from the top of the board at 12″, 40.5″ and 70″ from the nose. I believe these marks were used to create the shape, but it can’t hurt to have them on the bottom.
![]() Next I’ll work on the hardest part, the concave. Jon told me the concave should start about a third of the way down the board and Tom gave me some advice on how wide.
Next I’ll work on the hardest part, the concave. Jon told me the concave should start about a third of the way down the board and Tom gave me some advice on how wide.
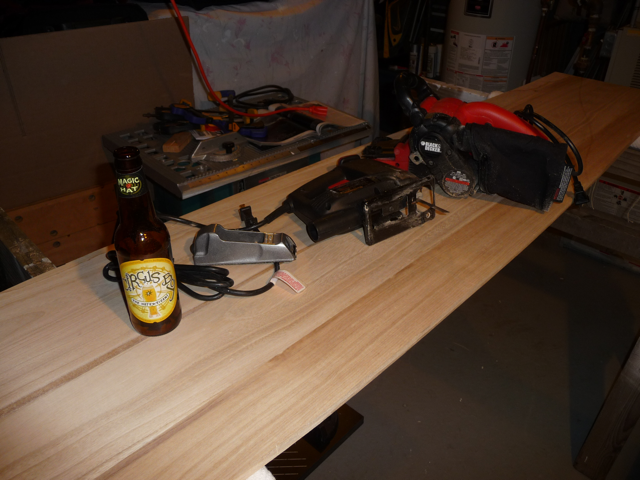
The board currently measures 7′ x 17 1/2″ x 3/4″. After the concave I’ll start sanding the entire board from coarse to fine grit, getting it as smooth as possible. After that I’ll oil (linseed) over the course of several days. I’ll apply 3-4 times and before each application I’ll do some light sanding to make it as slick as possible!  These are the tools I used for this phase (a special thank you to Circus Boy, for without it, none of this would have been possible).
As always, check back for pictures and updates. Please also post your comments and advice. I’d really like to know if anyone else has worked on shaping their own wooden boards or intends to try.
Posted by: Lawrence
Alaia Wooden Surfboard project: Post 1 | Post 2 | Post 3 | Post 4 | Post 5 | Post 6 | Post 6b | Post 7 | Post 8 Finis
It’s been hectic since I received the Alaia blank, but I plan to start on it in earnest this weekend and think I have a plan of attack (thanks in large part to Jon Wegner’s suggestions via email)…
* I’m still not 100% sure how I’m going to shape the concave. I was thinking about holding the edge of my belt sander at an angle (30°?) and from the center of the board, moving down towards the tail going no deeper than 1/4″ at the deepest point. Then I’d repeat the same process holding the planer on the opposite side from center. This should form the deepest part of the concave – a V shape of sorts about 4-5″ wide that I can then blend out toward the rails. When finished the concave will be about 8″ wide.
I made some test cuts on the parts of the blank that are waste. With no more than 18″ exposed past the clamps the jigsaw makes a clean cut, but anything more and it chatters and ripping is evident. I’ll have to keep clamping and un-clamping as I make my way down the board.
Check back for pictures and an update on my next post. Also feel free to comment on the plan above and lend any insight.
Posted by: Lawrence