Snow, Skate, Surf, Alaia Wake, etc

Reading Time: < 1 minute

Alaia Wooden Surfboard project: Post 1 | Post 2 | Post 3 | Post 4 | Post 5 | Post 6 | Post 6b | Post 7 | Post 8 Finis

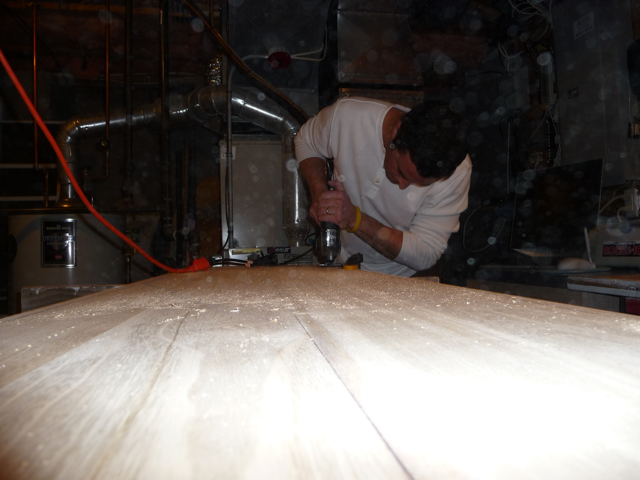
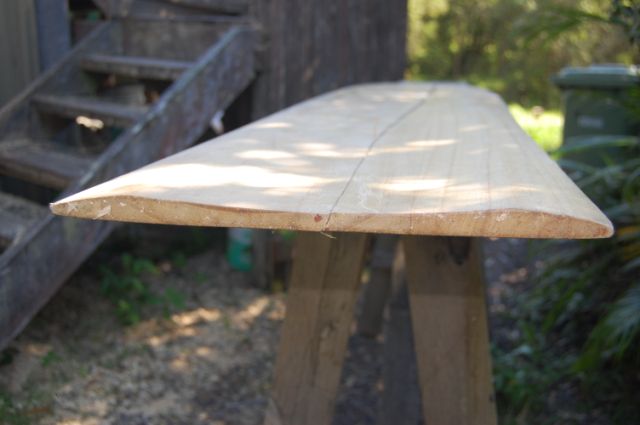
Mini Post: I’ve begun sanding the concave, but it’s hard to tell in pictures so I’ll do that in the next update. I started with the belt sander and formed the shallow ‘V’ in the center of the board. The concave should start a third of the way from the nose, so at 7′ overall, I started 28″ from the nose and worked my way to the tail.

I’m not exactly practiced at the belt sander and I removed more material in some areas than others. Before I go back to the belt sander and exacerbate the unevenness, I thought it best to hand sand a bit to get it more or less back to level. I’m working with 80 grit on the belt sander and 60 grit by hand (because it’s what I had). I’ll work my way up to 220 as I get closer to the final concave. When I start applying the linseed oil in phases I’ll sand before and between applications using 280-320 grit.

Looking at the board upside down and from the back the shape loosely resembles a bat. The lowest point in the middle, rising on both sides and then slightly dropping at the ends (see the picture of Rasta’s board in Post 1). The edge needs to be sharper on the bottom since the Alaia’s hold the wave that way (no fins here). When the sanding has progressed to a point where pictures clearly show what’s happening, the explanation above should hopefully be obvious.

Posted by: Lawrence

Reading Time: 3 minutes

Alaia Wooden Surfboard project: Post 1 | Post 2 | Post 3 | Post 4 | Post 5 | Post 6 | Post 6b | Post 7 | Post 8 Finis

Significant progress this weekend with the Alaia project. I cut the board to shape with a jigsaw, working in one direction. I said in the previous post that I wouldn’t cut the Stuth tail, but I had a change of heart. I like the side-cut it creates and given my 24 years of snowboarding I’m drawn to that shape (yeah, I’m that old and have boarded that long!).

Because the board needed to be clamped and un-clamped (3 times) I made cuts on either side of the board, with 90° cuts to remove material as I progressed. After the jigsaw work was done I used my belt sander to fine-tune the edges to get a uniform ~3mm distance from Jon’s marks (as explained in post 2).

Once I was satisfied with the shape, I used a pocket plane to put a 1/4″ bevel on the top edge (you can apply very light pressure since the Paulownia wood is so soft). Holding the plane at 45° and moving in one direction, I cut until Jon’s marks were no longer visible. After inspecting and small tweaks I flipped the board and transferred the center line which I’ll use to create the concave. I also transferred 3 perpendicular markings from the top of the board at 12″, 40.5″ and 70″ from the nose. I believe these marks were used to create the shape, but it can’t hurt to have them on the bottom.

Next I’ll work on the hardest part, the concave. Jon told me the concave should start about a third of the way down the board and Tom gave me some advice on how wide.

The board currently measures 7′ x 17 1/2″ x 3/4″. After the concave I’ll start sanding the entire board from coarse to fine grit, getting it as smooth as possible. After that I’ll oil (linseed) over the course of several days. I’ll apply 3-4 times and before each application I’ll do some light sanding to make it as slick as possible! tools
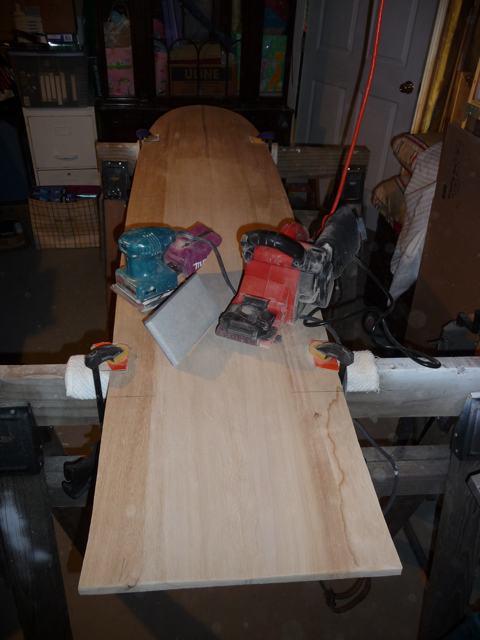
These are the tools I used for this phase (a special thank you to Circus Boy, for without it, none of this would have been possible).

As always, check back for pictures and updates. Please also post your comments and advice. I’d really like to know if anyone else has worked on shaping their own wooden boards or intends to try.

Posted by: Lawrence

Reading Time: 2 minutes

Alaia Wooden Surfboard project: Post 1 | Post 2 | Post 3 | Post 4 | Post 5 | Post 6 | Post 6b | Post 7 | Post 8 Finis

It’s been hectic since I received the Alaia blank, but I plan to start on it in earnest this weekend and think I have a plan of attack (thanks in large part to Jon Wegner’s suggestions via email)…

  • Standard Finley tail in favor of the Stuth (I can always get another blank right?!)
  • All cuts are going to be about 3mm from the lines that define the board’s shape
  • Form 45° bevels on the top and bottom using a small hand plane to start to shape the rails
  • Sand the rails to shape, leaving the bottom sharper as opposed to round
  • Cut an 8″ wide channel down the middle starting 1/3 of the way down from the nose*

* I’m still not 100% sure how I’m going to shape the concave. I was thinking about holding the edge of my belt sander at an angle (30°?) and from the center of the board, moving down towards the tail going no deeper than 1/4″ at the deepest point. Then I’d repeat the same process holding the planer on the opposite side from center. This should form the deepest part of the concave – a V shape of sorts about 4-5″ wide that I can then blend out toward the rails. When finished the concave will be about 8″ wide.

I made some test cuts on the parts of the blank that are waste. With no more than 18″ exposed past the clamps the jigsaw makes a clean cut, but anything more and it chatters and ripping is evident. I’ll have to keep clamping and un-clamping as I make my way down the board.

Check back for pictures and an update on my next post. Also feel free to comment on the plan above and lend any insight.

Posted by: Lawrence

Reading Time: 3 minutes

Alaia Wooden Surfboard project: Post 1 | Post 2 | Post 3 | Post 4 | Post 5 | Post 6 | Post 6b | Post 7 | Post 8 Finis

In an attempt to experience a spiritual awakening like an ancient Hawaii commoner, I decided to try and build and surf a wooden Alaia surfboard (OK, well at least build one). Traditionally a 10-12 foot fin-less board that in ancient times were made from Ula and Koa trees, my Alaia will be about 7 feet and is shaped from a blank made from light and sustainable Paulownia wood that doesn’t absorb salt water.

I purchased two ‘Finley’ blanks (one for a friend) from Jon Wegner at Wegener Surfboards in California. Jon and his brother Tom, Surfing Magazine’s 2009 Shaper of the Year are selling the blanks here in America, but they are made in Australia where Tom lives. Purchasing the boards from the Wegner’s was a pleasure and if this project inspires you, I highly recommend you contact Jon for your blank.

Before the blanks arrived by UPS ground, I prepared my workshop with padded saw horses, jigsaw, belt sander, palm sander, hand planes, and sandpaper in assorted grits. I’m not sure I have every tool I need or is recommended, but I’ll cautiously remove material, especially the concave, which I’ll likely do in stages after sessions (assuming I have a feel for the board). Classic case of ‘you can always take off but you can’t put back on.’

When I unpacked the Alaia’s I was pleased to see the blanks arrived in perfect shape. I’m eager to begin the project, which entails cutting the blank to shape, shaping the rails and concave and finishing the board. There are a number of resources available on the web I’ll refer to, including Olosurfer.com and woodworking forums such as woodworkforums.com.

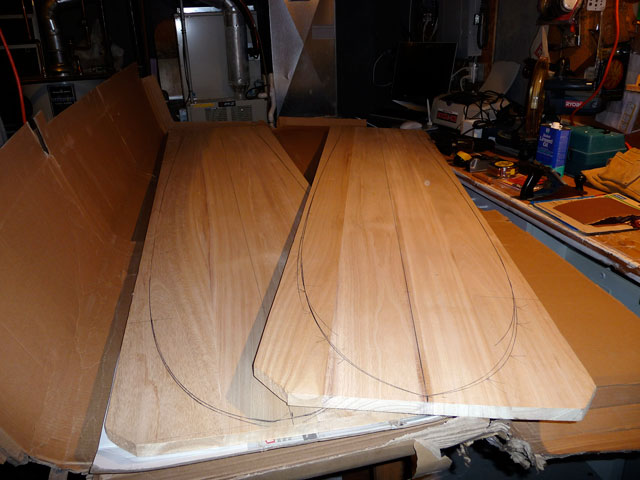
When completed, the Finley should have, according to Wegener Surfboard’s model description, “a light roll on the deck and a concave running from the nose all the way to the tail. The concave is 3/8” deep.” (Note: Jon recommended I keep more material on the board and stay within 1/4″) “This really helps keep the board from sliding sideways too much and gives the board more traction in the face.

The goal of the board is to give it just the right amount of flex. With good flex, catching the wave is easier and the board more responsive to turning.” Tom was kind enough to share the photo on the above-left of Dave ‘Rasta’ Rastovich’s board. This board has far more concave than I’ll need, but it gives an exaggerated idea of the curves.

Over the next several weeks, time permitting, I’ll be working on the Alaia and posting my experience and sharing photos on Bitness. If anyone has built an Alaia or is an experienced woodworker and can offer sage advice, I welcome your comments here, both for my benefit and anyone else interested in the Alaia.

Posted by: Lawrence

Reading Time: < 1 minute

Apprently FreeLine Skates have been around for years, but I just discovered this new way to hospitalize myself. A kind of intersection of skateboarding, rollerblading and RipStick, the $149 FreeLine skates look like they have plenty to offer in the way of building balance, performing flat-land tricks and of course transportation.

Comprised of 2 independent aluminum skates, FreeLine skates are stood on, not strapped on, using traditional skateboard grip tape to help hold you to a set of ~6 square inch plates. Two 72M custom grade polyurethane wheels are in vertical alignment under each plate and acceleration is obtained using the same motion you would on a RipStick.

https://youtube.com/watch?v=eo7rr3AKyC4%26hl

Posted by: Frank

Reading Time: 2 minutes

With temperatures well below freezing and finding myself miles away from any mountains, I’ve decided to post another indoor, off-season workout entry. For Surfing there isn’t an off-season unless, like me, you can’t afford a winter suit and find yourself bound to the shore watching the cool kids get all the waves to themselves.

To pass the time and stay in shape there are plenty of exercises that focus on strength, power, balance and endurance that don’t require any equipment, but as geeks we naturally want gadgets. Sometimes brilliant, sometimes a total waste of money, gadgets are the only thing that can get me stoked for weekend nights in my basement erasing the stress of the day.

http://multimedia.thestar.com/images/assets/179149_3.JPG

Source: http://multimedia.thestar.com/images/assets/179149_3.JPG

In the past, I’ve written about balance boards and a skateboard deck with Softrucks that helps build balance and let’s you practice tricks. Both solid low-tech gadgets I enjoy all year round – they never get old.

Two more balance trainers have surfaced and I’d like to get my hands on both to test. World-class surfers Dave Kalama and Laird Hamilton seemed to feel the SurfBall is where it’s at. Essentially a basketball under a shortboard (how is there a patent pending on this ‘technology’?), the SurfBall “…allows all users from the novice to the professional to work on developing fine motor skills and a keen sense of balance…” The SurfBall comes in three models; SurfBall Surfboard $399, SurfBall Stub $299 and the SurfBall Skate $159. The decks for the later two models resemble a wakeboard and skateboard (respectively).

The NoHo is another kind of balance trainer that uses a series of curve shaped pods which are easily attached to the bottom your surfboard. There is a well choreographed video on the NoHo Web site worth checking out. Longboard phenom Joe Aaron performs the same mind-blowing, practiced maneuvers on land that he does on the waves. I’m fairly certain Joe’s remarkable skills, which as a teenager leads me to believe he was born to surf. But you can’t totally discount the NoHo, it looks simple enough to set-up and using the same stick I surf appeals to me. The NoHo sells for $159 for boards up to 11 feet and $99 for boards up to 7 feet.

Check out both Web sites if you’re considering a balance trainer and let me know what you think.

Posted by: Lawrence

Reading Time: 2 minutes

For years Chuck Norris and Christie Brinkley have been selling a machine called the Total Gym, a machine that uses gravity and your body weight to deliver over 80 exercises. It seems to be working miracles for them, so why not another gravity-based trainer?

Vasa offers the Vasa Trainer, which, like the Total Gym, works by lifting your body weight up an inclined monorail and then lowering it back down. Vasa also offers a wind resistance unit called the Vasa Ergometer. Both devices are marketed towards swimmers, paddlers and surfers and have adapter kits to serve those respective users.

There are a lot of immediate and obvious benefits to a Vasa Trainer. Firstly, training anytime, anywhere is not always easy for swimmers, surfers, triathletes or paddlers who don’t live in San Diego. You need unfrozen water and I for one seem to be running out of that resource where I live in the North East. Vasa trainers also allow coaches to talk to their swimmers and see mechanics that would otherwise be hidden underwater and by churn. It’s also reported that the Vasa units require less time to train and can develop power and endurance in about half the time than in the water.

Dryland Swim Trainer

The Vasa Trainer sells for $899 and workouts are tracked manually. The $1899 Vasa Ergometer, which uses variable airflow resistance to emulate fast/slow currents, tracks your workouts and measures…

  • Watts
  • Force (both arms)
  • Stroke length
  • Distance
  • Pace

If you’re serious about swimming, paddling or staying in shape for long surfing sessions, then have a look at the Vasa web site and consider getting one of these trainers.

Posted by: Lawrence

Reading Time: < 1 minute

Many moons ago I wrote about the Airpod, a device you wear while snowboarding that measures hang time while pulling airs. Now an application for the iPhone does that and adds a few more bells and whistles to boot.

HangTimer for the iPhone uses the iPhone’s accelerometer and “hairy math” to calculate air time from the point of take-off, speed at take off and location at point of take-off. HangTimer detects your location and provides trail maps, snow reports and resort web cams (when available). For 3G users there is the following added functionality…

  • Detailed speed and location of every jump
  • Link to Google Maps to plot your hits
  • Top Speed at takeoff for every jump

Of course the HangTimer can be used for any sport where it’s safe to have your phone on you (mountain biking for example). I’m interested to know if, when climbing, will the HangTimer measure falling distance (WhipperTimer anyone)?

The full version of HangTimer sells for $9.99. There is a free version which lacks many of the features described above, but does measure hag time and tracks your best jump and total airs per session. Personally I feel this app is well worth it, since I can slip my iPhone in the pockets of unsuspecting ‘big air’ friends only to bring them back down to earth aprés.

Posted by: Lawrence

Reading Time: 2 minutes

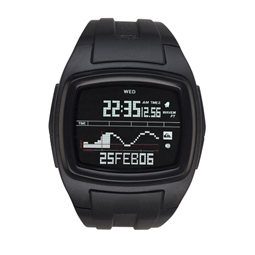
Tides don’t affect the breaks I surf all that much, but at my favorite spot, low slack tide (between low tide and when the incoming tide starts) is probably slightly better. That’s all the reason I needed to go out and plunk $95 on a new Quicksilver Moodak watch. Even though I carry my iPhone with me at all times and have the very capable and more informative TideGraph app.

The Moondak version I have is all black – including the screen and maybe I sound like a curmudgeon, but I’ll be damned if I can read it unless I find myself in close proximity to a 1million candlepower halogen light source. Another annoyance with the watch is the number of times I go to glance at the time, only to be in tide mode. The convenience of quickly checking the time is a frustrating 5 mode clicks away.

The Moondak is a good-looking watch which an abundance of features. Features like the lap and heat timer functions which are appealing to runners and surfers alike. The Moondak is also stylish enough that it can be worn out at night.

Consider the Moondak with the lighter face (it comes in different version, some much easier to read than mine) and if you have an iPhone, then by all means get TideGraph, it’s really good and the upcoming 2.0 version promises to be even better (including a map button that shows a satellite view of port in Maps app).

Posted by: Lawrence

Reading Time: 2 minutes

Surfing in the Northeast really picks-up in the Fall, with better wind direction for most breaks and storms that kick-up the swell to head / overhead conditions. To enjoy the quality surf, you have to endure the elements. When I decided to buy the O’Neill Mutant 4/3, I chose it for it’s reputation for comfort and warmth and because the neck can be replaced with a hood (included), for when the weather and water temps get even colder. O'neill Mutant

The one drawback – for me anyway – is how difficult it can be getting out of the Mutant. My left shoulder is gimpy from a partial dislocation suffered snowboarding years ago. Since that injury my arm gets cold and numb on every bike ride and paddling can leave me with a dull, throbbing pain for hours after a session.

When I tried the Mutant on at the shop I marveled at the flexibility and comfort. When I went to the dressing room to take it off however, I was a breath away from a full-blown panic attack. I whimpered between grunts that I might need some help, to which the shop worker replied “I’m not getting in there with you dude!”

I was assured I’d get the hang of getting out of the Mutant and maybe I will (I don’t own a 3mm, so I’ve already worn this suit 4-5 times). It takes at least 5 minutes to get my arms out. While I struggle to extract myself anyone could beat, mug or teabag me – whatever. I’m totally helpless, sweating, cursing and desperately trying to channel Harry Houdini.

This is a warm and comfortable suit. I already managed to get a small tear in the left thigh, but that could be from performing enough stunts (read: bad surfing) to fill an entire season of Jackass.

Reading Time: < 1 minute

We had a beautiful weekend here in New England. On Saturday a friend and I headed to the beach with our families with no expectation other than to paddle and keep fit for an anticipated swell later this week. We headed directly out to a point several hundred yards offshore and watched the blues feed, while on the beach our kids ran buckets of water back to their sand castle.

We paddled parallel to the beach about 1/3 mile and started to notice some small but rideable waves. After a dozen rides we paddled back to surf closer to our families. We met a guy from upstate NY who drove 5 1/2 hours to be there – a beach 15 minutes from our homes! He knew it would be a pretty poor day, but said it was still worth it.

Spending time with the family, being on the water and appreciating where we live made for a memorable session. Despite the crappy economy, the second highest unemployment rate in the country and tolerating seemingly endless political rants – life is good! If you still don’t think so, get a board and see for yourself.

Reading Time: 2 minutes

After nearly 20 years of research I finally bought a new surfboard – a 9′ Infinity Rad NoseRider. While not exactly a gadget, there is plenty of technology at work here worth mentioning. For starters the Rad NoseRider (heretofore known as the RNR) can be configured as a single fin or [3 fin] cluster. With the cluster setup the two outside fins are larger than the center fin (typically 2 5.5″ side fins and ~3″ center fin). The cluster has more of a short board feel, allowing for hard bottom turns and riding the face in vertical lines.

Cluster Design

Cluster Design

The RNR is virtually two boards in one, with a fast trimming and stable front end and a back end that allows the rider* to get into a turns quickly and carve much like you would on a smaller board. The bottom of the RNR is about 2/3 concave and beveled under the rails resulting in suction when you need it. I never fancied myself a nose walking Moondoggie type surfer, but to be able to walk-up on the nose to lengthen the ride and know the board isn’t going to come over top and skull you is nice.

Balance point

Balance point

I bought and rode the RNR on Sunday while a band played on the beach providing my friend John and I music to surf to. This weekend we have a tropical depression expected to cause swells as high as 8′ on Saturday. That’s more than enough music to my ears.

* Not this cat – not yet.

Reading Time: < 1 minute

Bitness went on hiatus this Summer, but only we sort of didn’t intend it to last the entire Summer. Bitness was hacked by some crackers who had nothing better to do than waste our time and piss us off. After tediously extracting all the evil scripts that littered the majority of posts, deleting rouge directories created on our server, changing all passwords (the new universal password is f!tgeek3) we’re back.

For those of you who haven’t completely given up on the Fit Geek, the Summer was a relaxing time filled with sunshine and gadgetry. In the coming days we’ll be writing about a new swim training device, a new surfboard purchased by one of the fit geeks, as well as some golf clubs – yes there is technology at work in surfing and golf worth exploring.

Bitness is back in business, thanks for tuning in…

Reading Time: < 1 minute

I saw this a few months ago but still keep it bookmarked and watch it every-so-often. So why not share?

https://www.youtube.com/watch?v=tM8LZdDzs-8

Posted by: Frank

Reading Time: < 1 minute

Mountain Hardware’s Red Savina Heated Glove reacts to the temperature of the hand to maintain a comfortable climate. The light and flexible heating layer is housed in a protective polyurethane film within the glove. The system is made up of three lightweight, low profile and Red Savina Gloves
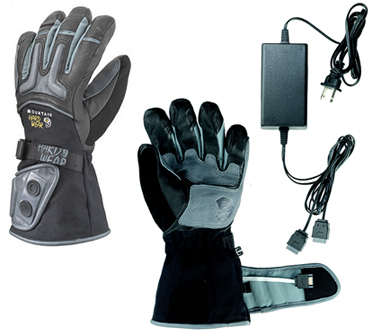
flexible lithium polymer batteries, each weighing about a quarter ounce to provide heat to the fingers and palm. The gloves are designed to provide up to 6 hours of continuous heat, and come with a charger.

Available in men’s and women’s versions for $300 August 2008 – just about the time I’m elbow deep in a cooler searching for a cool one.

Source: The Daily Dose