Snow, Skate, Surf, Alaia Wake, etc

Reading Time: 2 minutes

To non-surfers, the Northeast seems an unlikely place to find good waves. It’s not California, not Hawaii and too cold most of year to get in the water… right? It seems a well kept secret that waves here in the Northeast are sometimes great and with the right gear it’s never too cold!

The only time cold-water surfing hurts is when it comes time to get out of the water and strap the boards on the roof. I’ve dropped my fair share of F-bombs when my fingers and face froze while fumbling to get my fish fastened (fins forward friends).

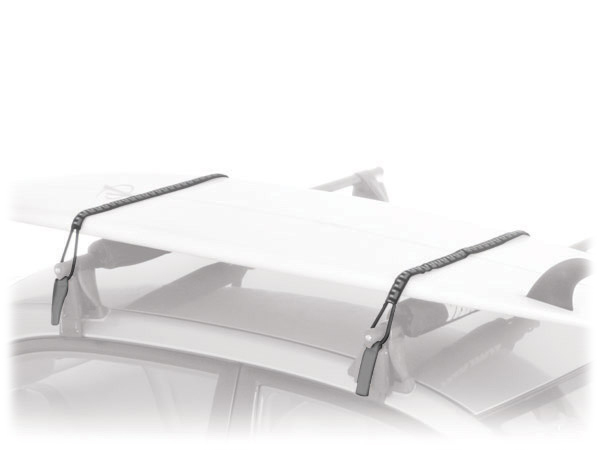
This year a revelation – the Yakima StrapThang which retails for about $70. Now cold-weather surfers everywhere can quickly and securely fasten up to 2 boards (or a board bag) with two quick pulls on bungee cords that hook over special bar-ends (part of the StrapThang package). The time from ocean, to car, to shower (still in your suit mind you) has never been quicker or easier.

I use the Yakima StrapThang in the warmer months too. While my friends are busy weaving straps and fastening buckles, I’m out of my suit and hitting Joyce’s for an early pint, or grabbing some breakfast at the Ocean Mist after dawn patrol. It’s also the quickest way to get in the water too, with no knots or buckles to undo you can simply release the cords, grab the board and go.

The StrapThang probably works with other rack systems, but you need the included hooked bar-ends which are made for the Yakima system. These ensure that the bungees don’t release unexpectedly and your board goes sailing. The StrapThang should also be used with crossbar pads, Yakima sells theirs for about $30.

The loops on the StrapThang are the right size for bare fingers, but not quite big enough for gloves (at least not over 5mm), so you may want to add some cordage as I did to make a larger loop that’s easier to grab.

If you are looking for a reliable rack system for surfing you need to check out the Yakima StrapThang. Surf more, freeze less.

Posted by: Lawrence

Reading Time: < 1 minute

Here in the Northeast we were just blessed with great surf for the past 4-5 days. I was fortunate enough to make it out for 3 of these days and loved every minute of it… almost.

One of the most frustrating parts of surfing is after earning your wave in a lineup, dropping in and realizing when you pop-up to stand, your feet are tangled in the leash. Called ‘hog-tying,’ this is not only frustrating, it can also be dangerous since your realization often begins when you are coming down the face of the wave.

A few weeks ago I talked with local surf legend Peter Pan who swears by a leash called the XM Tangle Free leash. The concept for this leash is so simple, a small sliding weight on the cord creates just enough drag to keep it shaped and behind the rider, thus preventing it from sneaking up and hog-tying your feet.

Recalling my conversation with Pan I headed to his surf shop Gansett Juice and picked up the 9′ XM Comp leash. This leash has a .220 diameter cord Double Swivel Comp with Slider (the regular XM Tangle Free has a .270 cord). Now I don’t get tangled every session, but I do feel the leash around both feet every session and I have to say with the XM Tangle Free leash I never felt the leash around both feet. Not even once.

Check out the video below to see the leash in action and if you surf and have ever been hog-tied, think about buying the XM Tangle Free leash. Even if you already own a leash, it’s always best to have one on stand-by in the event yours breaks mid-session in epic conditions!

Posted by: Lawrence

Reading Time: 2 minutes

In the Northeast the weather can change in an instant. This time of year temperatures fluctuate +/- 20° F almost daily. Being resistant to bad weather is important in these parts (I see kids in t-shirts at the bus stop in January), being prepared for bad weather is vital.

Mountain Hardwear, a manufacturer of innovative and high quality outerwear and gear, has begun incorporating a heating and charging system into their Radiance and Refugium jackets. Developed over the past several years, the heaters are constructed using stainless steel fibers spun into yarn and sewn into the garments in three strategic locations (one in the back and two in the front) and are reported to work in temperatures 20-30° below freezing and continue to work for up to 8 continuous hours.

In addition to providing heat, the Radiance and Refugium jackets are also equipped to power an array of personal electronic devices, when utilizing the Tech Connector (sold separately for $50). Charge your MP3 player, GPS, lights cellular and satellite phones, etc – all in the front left pocket while simultaneously enjoying the warmth the jacket’s heaters provide.

To power their heated and charge-capable garments, Mountain Hardwear selected the Moshi Power System by Ardica Technologies. Surprisingly unobtrusive, the Ardica system uses a flat, flexible lithium ion battery array that slides into a compartment in the upper back of the jackets. Purchased separately for $145, the Moshi Power System provides power and charging capabilities via a USB cable threaded neatly and discretely from the power source located in the back to the front left pocket. The Moshi battery can be recharged from any standard wall jack and reportedly charges 80% in 1.5 Hours and 100% in 3 hours.

Weighing just 295 grams (~10.5 ounces – about the same as 2 iPhones), the Moshi battery can be pulled from the jacket and used as an on-the-go source for a charge. Fully charged, the Moshi battery can reportedly provide up to 20 charges before needing to be recharged!

All-in-all, the cost of the Radiance or Refugium jackets, with charging capability, is about $425, placing it in the price range of comparative high-end jackets. Wear alone, or under a shell for extraordinary warmth and charge portable electronics on the go!

Posted by: Lawrence

Reading Time: 2 minutes

I’ve taken your standard hand-held Sony camcorder on many hell-runs down steeps or through glades and only broke one camera. This point of view (POV) filming let’s me relive snowboarding in the off season, reminding me of favorite lines… and the one camera I ruined. Was it a rock or a root I hit? I can’t remember, but I do recall that having both hands free when snowboarding is kind of important.

There are helmet and even surfboard-mounted cameras like the GoPro cameras; great, low-cost cameras that capture your personal Jeremy Jones moments in either video or pictures taken at set intervals. If you’re looking to step-up the recording quality and not give up much in the way of size and weight, the VholdR CountourHD1080p is worth looking at.

The ContourHD is easy to use, even with gloves on. Simply slide the record switch forward to record and slide it back to stop. Don’t like to hear your grunts or record your expletives (I’m still talking about snowboard filming here), the CoutourHD can record in silent mode. It uses two lasers to help you line-up your shots when mounting it on a helmet, goggles or handlebars and the battery lasts up to 3 hours.

The CountourHD is spartan when it comes to controls, but I feel this is a positive. The less small or moving parts on a device taken out in the wild, the better. If comes with Easy Edit software that allows you to adjust contrast, exposure, metering and audio gain. I would like to see Easy Edit ported to iPhone or Android, allowing you to make adjustments to changing conditions and light when you’re out-of-bounds and your office is the glade before you.

At just 4.3 ounces the ContourHD can be pre-ordered at vHoldR for $330, making it is as light in the wallet as it is in the hand. Get one and get outside to record your next adventure. VholdR has a good community of users posting their adventures on VholdR.com.

Posted by: Lawrence

Reading Time: 1 minute

Surfing in the Summer is quick and easy; boardies, rash guard and off you go. The only problem is there’s nowhere to stash a key (which in wetsuit season goes behind my calf). Surfers, runners, bikers, anyone who drives somewhere to get a workout has to hide their keys in the wheel well or under a rock and hope both the key and the car are there when they return.

A product called HitchSafe is a 4 digit combination safe that goes in your trailer hitch. It has a drawer that slides out to put your key and other valuables. Some trucks, including those with sliding rear windows can be easy to break into and the HitchSafe provides a safe alternative. The HitchSafe is also a clever place to keep a spare key in the event you lock your keys in the car.

The HitchSafe fits standard 2″ hitch receivers, with the exception of the Toyota Tacoma 2005-07 and 2007 Tundra, both have an extra band of metal around the receiver and require longer bolts. Also some 2005 Toyota Forerunner’s have OEM factory hitches with rounded corners ans require filing off each corner on the HitchSafe for it to fit. A rubber cover goes over the end of the safe to provide a level of protection from the elements and also makes the trailer hitch looks like any other.

The HitchSafe is available on Amazon for $69.95.

Posted by: Lawrence

Reading Time: 2 minutes

In the Summer I usually surf before 7 a.m. or after 5 p.m. because the parking lot is open to non-residents. These are also prime time hours to find the treasure hunters, typically older folks with metal detectors strapped to their arms, large headphones on their heads and clutching onto metal strainers as they comb the beach in search of loose change, jewelry and watches.

I always ask what they’ve found that day and what’s the best thing they’ve ever found. I’ve heard stories of wedding bands, diamond earrings, Rolex watches and other treasure, but more often than not it’s spare change, bottle caps and trash. As a way to appease the treasure gods they almost all properly dispose of the trash. For jewelry and watches most claim to turn-in their booty to the police, where after so many weeks of it going unclaimed, it goes back to the treasure hunter guilt-free.

metal detecting sandals

I’ve always wanted to search the beach for lost treasure, but I’ve always felt that was an older persons hobby and by the way, a good form of exercise. For a youngster such as myself it seems somewhat desperate and overly nerdy, but I think I have found the solution in a pair of covert metal detecting sandals offered by Hammacher Schlemmer.

With a copper coil built into the right sandal and a battery pack/receiver that straps onto your leg, you have sufficiently disguised your true passion with something more along the lines of a parolee simply enjoying his or her newly found freedom by taking a stroll on the beach. Able to detect metal objects as deep as two feet, some might even mistake your fancy footwork as you hone-in on an object as a freedom dance (and they are none the wiser).

The leg unit also flashes, vibrates and buzzes as you happen upon the presence of metal. Be sure to alert concerned onlookers that it’s OK, you’re within your legal boundary and that gigantic hole you’ve started digging isn’t a hideout. Powered by a single 9-volt battery, the Metal Detecting Sandals are $60, a paltry price to pay for your dignity and possibly a Rolex.

Posted by: Lawrence

Reading Time: < 1 minute

In the past week I’ve had 4 people tell me how grateful they were that I turned them on to Steepandcheap.com. Steep and Cheap sells gear (I’d describe it as general outdoorsy gear) one item at a time until it’s either sold out or times-out, at which point it’s on to the next item.

Steep and Cheap mostly sells-out because the deals are good – usually in the 60% off or more range. Act fast if you see something you like! With back-to-back deals all day long it can get addicting and there’s a number of ways to stay tuned-in to deals that are poppin’ (RSS, sidebar gadgets, plug-ins, email, IM and soon an iPhone app).

I’ve been a Steep and Cheap customer since they started and have seen the concept grow wildly. Sister sites now include…

  • Chain Love for biking gear, including BMX and Mountain biking
  • Bonktown is more for the road cycling enthusiast
  • Tramdock for you two-plankers and especially good deals off-season
  • Brociety caters to snowboarders mostly, again… good off season loot to be had
  • Whiskey Militia is so aggro you probably already know they sell skate and surfing gear. Get some.

Check them out let me know what you think. I’ve only had great experiences with them, even returning gear I decided I didn’t need – they make it easy.

Posted by: Franz

Reading Time: < 1 minute

I took the Alaia out today for the first time. I had been surfing my longboard in about shoulder-high surf for over an hour and was anxious to run back to the car to get it. When I finally popped in the water with it I sunk like a stone. I spent the next 15 minutes or so trying to figure out the balance point and how to paddle it without it sliding from under me.

Once I felt comfortable controlling the board and paddling around, I walked into about waist high and belly-rode a dozen waves – FUN. I felt like I could turn it and was feeling more confident. I tried to stand but admittedly couldn’t – not this time out. I sort of stood, but nothing where I was actually riding so much as sinking. In the right conditions and I’ll get up on the Alaia and ride it.

The board became a conversation piece on the beach and in the parking lot. After I answered a litany of questions from one older guy he said I’d have the whole speech down-pat soon. Another guy told me he made an Alaia this winter using cedar and suggested I round the bottom rails. I’ve not heard or read this anywhere – always thought the rail should be knifey on the bottom? He was impressed with the board and that I had Paulownia wood – I told him where he can buy it.

Posted by: Lawrence

Reading Time: < 1 minute

There is a good interview with Jon Wegener on Thalia about shaping an Alaia. But first, a quick word about Bitness. We’re in the midst of a re-org – lining up manufacturers for new product reviews, introducing new contributors, marketing, etc. Please stay tuned for more exciting news and also let us know if there is anything you would like us to test or write about.

Now, on to the article…
http://site.thaliasurf.com/blog/interview-with-jon-wegener-from-alaia-surfboards/

Reading Time: < 1 minute

I’ve owned a Suunto Observer for years, a gift from the wife and I love it. With it I can tell which direction I’m headed, altitude, barometric pressure, temperature and of course the time. While somewhat bulky, it is still stylish IMHO and once configured performs well.

Timex will start shipping the Timex® Expedition® WS4™ on May 1, 2009. Similar in functionality to the Suunto, but no where close in looks, the gargantuan Expedition WS4 offers altitude, weather conditions, compass heading and time at a glance.

Unlike the Suunto, which has you spinning 360s to configure the compass, the Expedition WS4 can be used the moment it comes out of the box UPDATE: Both the Suunto and the Timex Expedition WS4 require manually calibrated. Timex also offers a fabric band to make wearing it over your gear easier, allowing for outside temperature readings, not your arm.

Dubbed a “wrist-top adventure instrument,” the Expedition WS4 has weather forecasts that look to be fairly simple to read. On my Suunto I need to be somewhat of a weatherman and figure it out for myself. Available in a half dozen colors, water resistant to 50 meters and lit by Indiglo, the Timex Expedition WS4 is expected to cost about $200.

Posted by: Jay

Reading Time: < 1 minute

Alaia Wooden Surfboard project: Post 1 | Post 2 | Post 3 | Post 4 | Post 5 | Post 6 | Post 6b | Post 7 | Post 8

I’ve finished oiling the Alaia and all that’s left to do now is ride the thing. I had a lot of fun building the Alaia and meeting others out there doing the same all over the world. In the end I’m very pleased with how it turned out and I’m really anxious to go and ride it.

I applied linseed oil a total of 4 times, with a full day between applications. I was pretty generous with the linseed oil, letting it soak in for 10 minutes before wiping away the excess with clean shop rags (I used these same rags to apply the next coat). I did light sanding between coats, after the second coat I noticed it was gummy in parts where I didn’t get rid of all the excess. Sanding those gummy areas didn’t help, so I went with a Scotchbrite pad I normally use tuning snowboards and it cleaned it right up.

This is the end of this series and I open it up to any questions or comments. I’ll post an update/pictures when I get it in the water (hopefully in about 4-6 weeks). There are a few of us eager to give it a go and it should make for an entertaining session!

Posted by: Lawrence

Reading Time: 2 minutes

Alaia Wooden Surfboard project: Post 1 | Post 2 | Post 3 | Post 4 | Post 5 | Post 6 | Post 6b | Post 7 | Post 8 FInis

Thank you to my wife Jen for drawing the turtle, transferring it to the board and trusting me to burn it in. For those interested, I used a Creative Versa-Tool Kit - 120V/ 25-Watt (made by Walnut Hollow) purchased for about $25. I used the tapered point and lightly followed the penciled-on drawing. As the wood became scored, I could press harder to get the burn and depth I wanted. After about 10 minutes the tip was so heated-up it actually bent a little (causing a minor blemish).

I’ll let the pictures do the talking (click images to enlarge)…

Posted by: Lawrence

0 Comments/by
Reading Time: < 1 minute

Alaia Wooden Surfboard project: Post 1 | Post 2 | Post 3 | Post 4 | Post 5 | Post 6 | Post 6b | Post 7 | Post 8 FInis

Minor update – life again overwhelms! The turtle was drawn on and will be burned this week. Looks great thanks to the wife!

A friend sent this great trailer called ‘Tom’s Creation Plantation Trailer’ – it’s a trailer for the half surf film/ half shaping tutorial about ancient wooden surfboards (Alaias) due out in April. Of course I’m very interested in this video and will review it once I can get my hands on it.

Watch the trailer – some really good footage in there (including an itchy squirrel)…

Posted by: Lawrence

Reading Time: 3 minutes

Alaia Wooden Surfboard project: Post 1 | Post 2 | Post 3 | Post 4 | Post 5 | Post 6 | Post 6b | Post 7 | Post 8 Finis

Paulownia dust tastes like shit. I was smart enough to wear a respirator, but in between sips of beer it was bound to be tasted and digested. I consider it part of the “Alaia chi” – I am now one with this board that took longer than I expected to finish – but I’m stoked with the results.

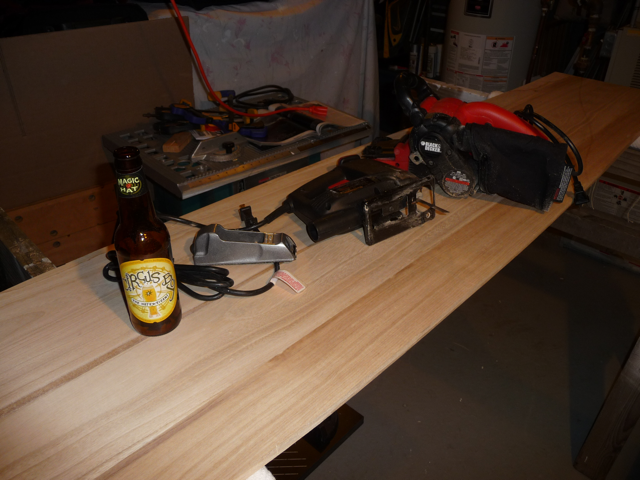
Between sick kids, work, travel, snowboarding, sick me, sick wife, dog sitting, freelance, guitar lessons, shoveling snow and just about any excuse I can conjure… well, I took my sweet time. No challenge really since I don’t have a winter suit and looking at a finished board for months will be torture. But by working slowly I was methodical, careful and well researched. I think I made a pretty sick Alaia, I’ll know when I ride it in late April (most likely).

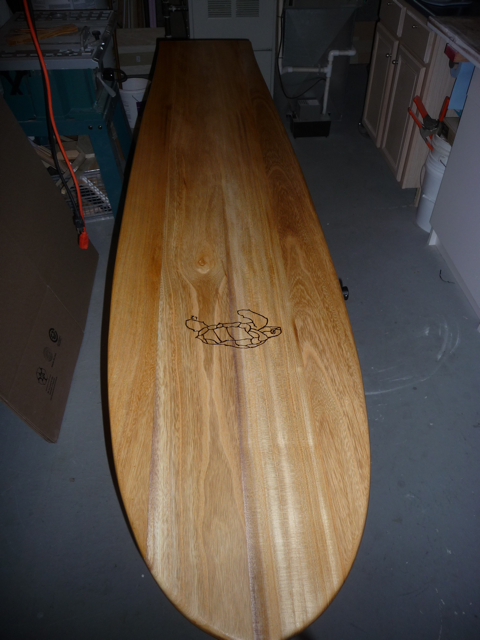
There’s still no oil on it yet (waiting to wood-burn a turtle on it), but I sanded to 400 grit and it already feels smooth as silk. I will definitely build another one of these and I think if I could do anything differently, it would be to do the entire project outdoors. The time to clean up the dust was almost as long as the time spent building the board! Between a tack clothe, shop vac, compressed air and elbow grease, I finally have a proper, dirty basement workshop again.

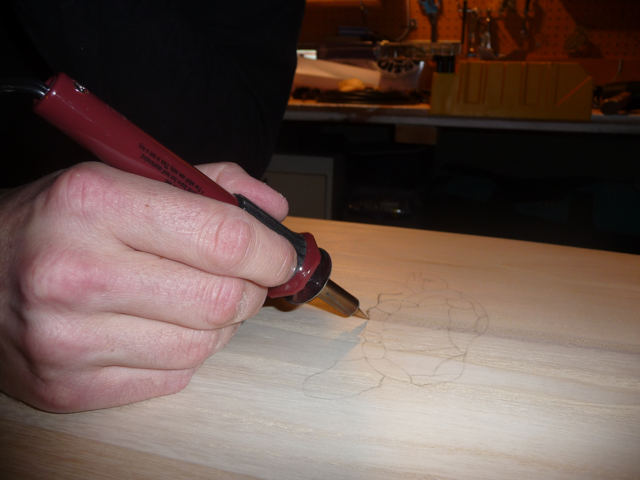
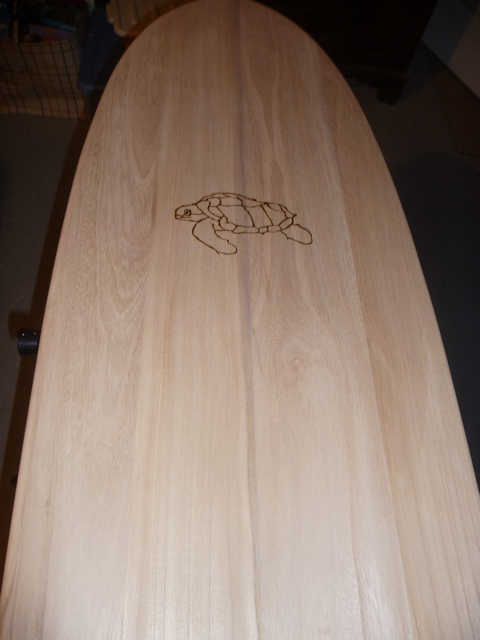
Once I burn the turtle graphic and apply the oil I’ll wrap-up the series of building posts by posting some final pictures. At some point in the spring when I can venture out in my 4/3, I’ll post an update on how it was to ride. For now it’s a conversation piece that beckons me. Hamish in Australia, who has been following this project, has his Alaia finished and has already and had a session with his mates. Hamish says “the trick is to paddle really hard, not let the tail swing around from underneath you” and he also reports it is very fast.

Click on any of the images for a larger view. You can hopefully see an eased top/deck – rolled edges and sharp edges on the bottom. The picture from the tail shows the concave best and the upright pic to the right the overall shape and size. I would estimate the total time to get the board to this point to be about 12 hours. I don’t expect the 3-4 coats of oil to be more than an hour max (light sanding between daily applications) and the turtle graphic maybe 30 minutes.

Thank you for all your comments and please keep them coming. Hamish sent me pics via Facebook and he did an amazing job. I’d like to see what others have done and perhaps (with your permission) post pictures of the Alaia’s all of you have built.

Posted by: Lawrence

Reading Time: 2 minutes

Alaia Wooden Surfboard project: Post 1 | Post 2 | Post 3 | Post 4 | Post 5 | Post 6 | Post 6b | Post 7 | Post 8 Finis

They say a picture is worth a thousand words. In this case I think the words better do the talking because it’s difficult to capture the progress made with the concave in a photo. I haphazardly arrived at a method for creating the concave and it goes like this…

  • Snap center-line (nose to tail) with chalk
  • With the belt sander on the center-line at shallow angle, I quickly and carefully sand in one direction
  • With hand sander, I work from and apply pressure to the center and work outwards
  • I sand a length of about 18″ at a time, using 12 strokes near the center, 6 a little further out and 3 near the edge

… I repeat this process over and over, each time making the concave deeper and feathering out toward the edges a little more. Reestablishing the center line helps keep the deepest point consistent. I happened to have a weighted metal rod I used to use when tuning skis. I place this rod on the top of the concave on one side let it roll up the other side of the concave and eventually settle in the center of the board (if it doesn’t I sand more). I included a picture of the rod as well a some calipers I’ll use when shaping the rails.

The hand sanding helps refines the work done with the belt sander. I felt a little out of control with the belt sander, but found the results more predictable when working quickly (not letting it bite too much in one place). I tried using the palm sander and it did a nice job, but the dust got out of control. It if wasn’t winter I’d be working on this project in the garage, but I’m in my workshop – which is also the boiler room , where I need to keep dust to a minimum.

The process is taking longer than anticipated, but I’m happy with the results so far. Punxsutawney Phil says 6 more weeks of winter anyway, so I’ve got nothing but time. I’ll keep working on the concave using the methods described above and start the next post on the Alaia project with the overall sanding and Linseed oiling.

Posted by: Lawrence